If you’ve done PPC advertising for a few years, you’d have realized that Google likes to push you to show your ads for more and more search queries.
In other words, it encourages you to run automated bidding and switch to broach match keyword type so that your ads are shown for a higher number of search queries, which means more clicks and ultimately more money for Google.
But if you’re running automated bidding and you’ve set limits on CPA or ROAS, trying broad match is not a bad idea, because why not let Google try to see if there are additional search queries out there that may drive good traffic and conversions for you?
Of course, you still have to be careful. You don’t want to show your ads for random queries. Plus, in some cases, even if Google has reduced your bid, it still may not perform well for you.
And as somebody reading this article, you probably like to have more control over your campaign. You’re listening to Google, you’re trying a bit of broad match, and now you want to check if Google is really showing your ads for the right queries.
The Rule Engine Strategy That Monitors New Search Queries
That’s why, we at Optmyzr, have built a tool to help you stay on top of all that. It’s called the Rule Engine.
The Rule Engine lets you create custom optimizations that can make bulk changes to your Google Ads, Amazon Ads, and Microsoft Ads accounts. These can be strategies that can help you bid to a target CPA or, give you a list of keywords and ad groups that are more expensive than their peers.
You can review and apply the suggestions or even automate the process by running the strategies on a schedule.
Now, here’s a strategy to monitor your new search queries in Google Ads.

It first compares the search query data of the past seven days with that of the previous seven days to find newer queries.
And then it presents the list of these new queries. Of course, you have to keep in mind if these queries did show up at some earlier time (even before those 14 or 7 days ago). You can control that using the rule engine by changing the date ranges, conditions, or boundaries to show the data you need.
Why Monitor New Search Queries?
Monitoring search queries this way provides you with some really useful insights.
You will learn about the changes in your audience’s behavior, interests, and priorities. Not just that, you can take those insights and use them in your other campaigns outside of PPC such as:
- Optimizing your landing pages
- Modifying copy/messaging in your email/social media marketing campaigns
- Creating organic content around those queries
Now, coming back to the strategy, you can create it using the Rule Engine by following the below steps.
How to Monitor New Search Queries in Google Ads Using Rule Engine?
Step 1: Go to Optimizations -> Rule Engine -> View & Create strategies.
Step 2: On the top-right, click Add Strategy -> Add new strategy.
Step 3: Select ‘Pick Optmyzr recommended strategy’ and click ‘Next’.
Step 4: Under ‘Select a Goal’, select ‘Search Queries’ and click ‘Next’.
Step 5: You will find multiple strategies here. But for this use case, select ‘New Search Queries’ and click ‘Next’.
Step 6: Click ‘Show me Optmyzr’s suggestions’. This is the fastest way to view your results. But if you want to customize the strategy like changing the date ranges and adding more criteria, click ‘Give me full control’. Then click ‘Proceed’.
Rule Engine prepares the strategy and previews the results. Depending on the size of your account, this may take up to a few seconds to a minute.
And now you’ll see the new search queries that are appearing in your account.
Safeguard your PPC campaigns
In the wake of ad platform automation, setting up even the smallest of changes, like the one above that takes just a few minutes goes a long way in protecting your PPC accounts, providing a bit of PPC insurance if you will.
So, if you like what you’ve seen, go ahead and try it in your Optmyzr account. But if you don’t have one yet, consider starting a 14-day free trial. You can use all of our tools with no limitations to manage your PPC more efficiently.
Our support team always receives very interesting questions from our customers, and some of these questions require creative solutions. An example is “How can we set different daily budgets for each day of the week or month?”.
And while this question would have had us scratching our heads a while ago, now the answer is simple: You can automatically change daily budgets on specific dates using Rule Engine and Google Sheets.
Let’s say your account runs a promotion on Tuesdays, or the highest volume of purchases occurs during the first five days of the month, so you want to allocate more budgets on these specific days.
With the method I describe below, you won’t have to worry about updating your budgets manually. You will only need to connect a Google Sheets document with the correct information to Rule Engine and let Optmyzr take care of updating the daily budgets for you.
Step 1: Create a new strategy for Budgets in Rule Engine.
Go to Optimizations > Rule Engine > View & Create Strategies and click Add a New Strategy > Create my own strategy > Budgets.
Step 2: Set up your spreadsheet.
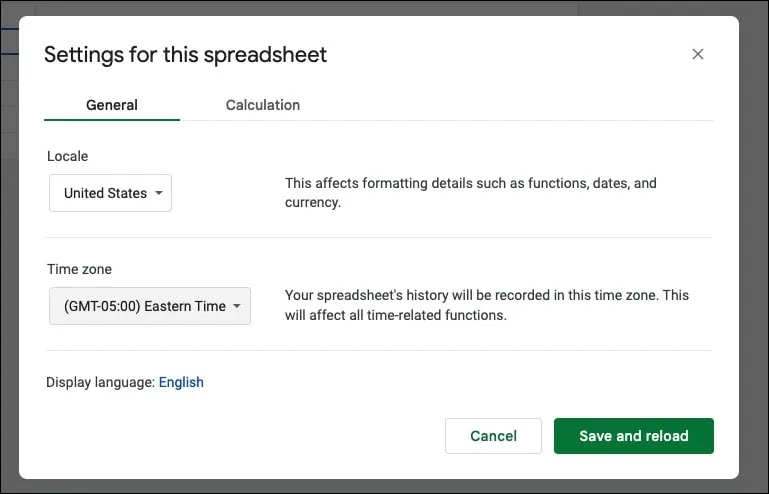
Make a copy of this spreadsheet. Go to the “File” menu and select “Settings” to update the spreadsheet’s time zone.
Next, click the “Share” icon and share view access with rule-engine@optmyzr-automation.iam.gserviceaccount.com (this is the email address Rule Engine will use to read your spreadsheet contents).
Step 3: Connect your spreadsheet to Rule Engine.
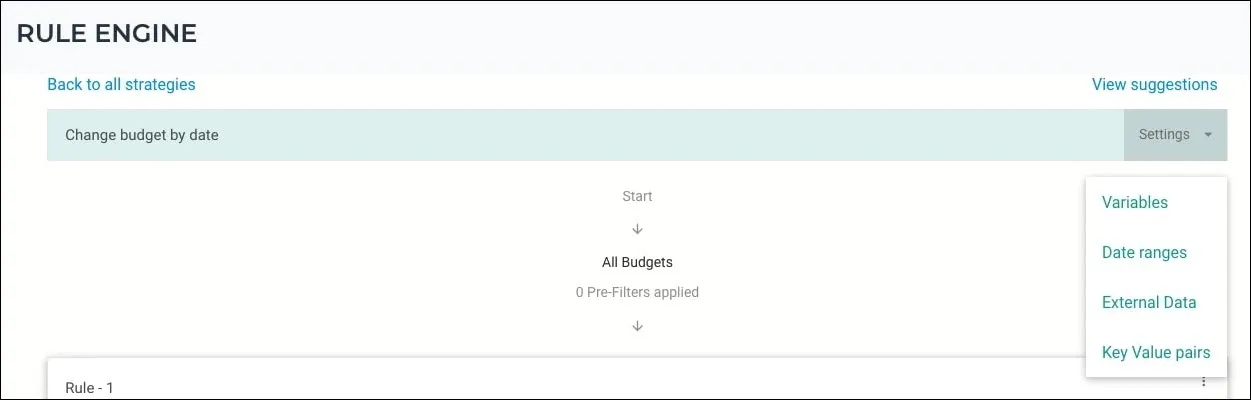
Go back to your Rule Engine strategy, click “Settings” and navigate to “External Data” to paste your spreadsheet’s URL.
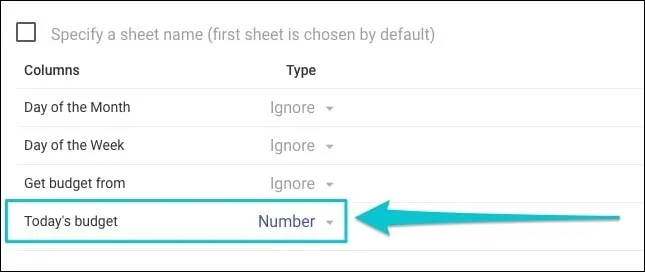
In the column settings, select “Number” as the value type for “Today’s budget”.
Next, click the “Get Sample Data For Your Account” button to download a CSV that includes your account’s complete list of budgets with their corresponding IDs and names.
You will need this information to complete the Google Sheets document.
Step 4: Add your budgets to the spreadsheet.
Back on your Google Sheets document, you’ll see three different sheets:
In the “Budgets” sheet, add a row for each of the budgets you want to update automatically, along with any of the following mandatory fields that you got from the CSV mentioned in the previous step:
- BudgetId: The ID of the budget to manage
- BudgetName: The name of the campaign or shared budget you want to manage automatically. This field is a case-sensitive, exact match.
Note: You don’t necessarily need to include both BudgetId and BudgetName. Just one of the two will do.
For each budget, make sure to select where to get the daily budget from (Week or Month sheet):

You can specify the daily budgets per date in the “Month” and “Week” sheets. The “Budgets” sheet will automatically grab the information from any of these, depending on your preference.
For example, I have a specific budget for Tuesdays for Sample Budget A, so I select “Get budget from Week sheet” and update the Tuesday budget in the Week sheet accordingly.
Step 5: Finish your Rule Engine strategy.
Go back to your Rule Engine strategy once more and add a neutral condition (if statements), for example: Daily Budget > 0.
Note: A neutral condition is a parameter that is always true. Since we’re not creating a performance-based optimization, a condition like “Daily Budget > 0” ensures that the strategy runs all budgets from your spreadsheet.
Now let’s update the Actions (then statements); by default, this is set to “Include in Report” click it to edit it and change it to “Modify Daily Budget” and “Set Daily Budget”.
In the “Set Daily Budget to” field, change the Value Type to “A Spreadsheet Column” and choose “Today’s budget”:

You can follow the same steps for the “Min daily budget” and “Max daily budget” fields.
Step 6: Test, preview and automate.
After you complete all the previous steps, your strategy should look like this:

You can now click the “View Suggestions” button to preview and automate your strategy.
Note: You may get some warnings. As long as none of the warnings are for the actual budgets you want to update (the ones on your spreadsheet), you can ignore them.
If everything looks good and you are ready to automate your strategy, click “Automate” and set it to run daily within any of the listed time ranges. Remember that these are in GMT, so be sure to use the closest equivalent time to midnight in your time zone.
Don’t forget to enable the “Apply Changes” option to authorize Rule Engine to apply changes to your budgets with this automation schedule.
That’s all! If you have any questions, or if you’d like us to have a look at your strategy before you start running it, just email us: support@optmyzr.com – we’ll be glad to help you.
Additional reads we recommend
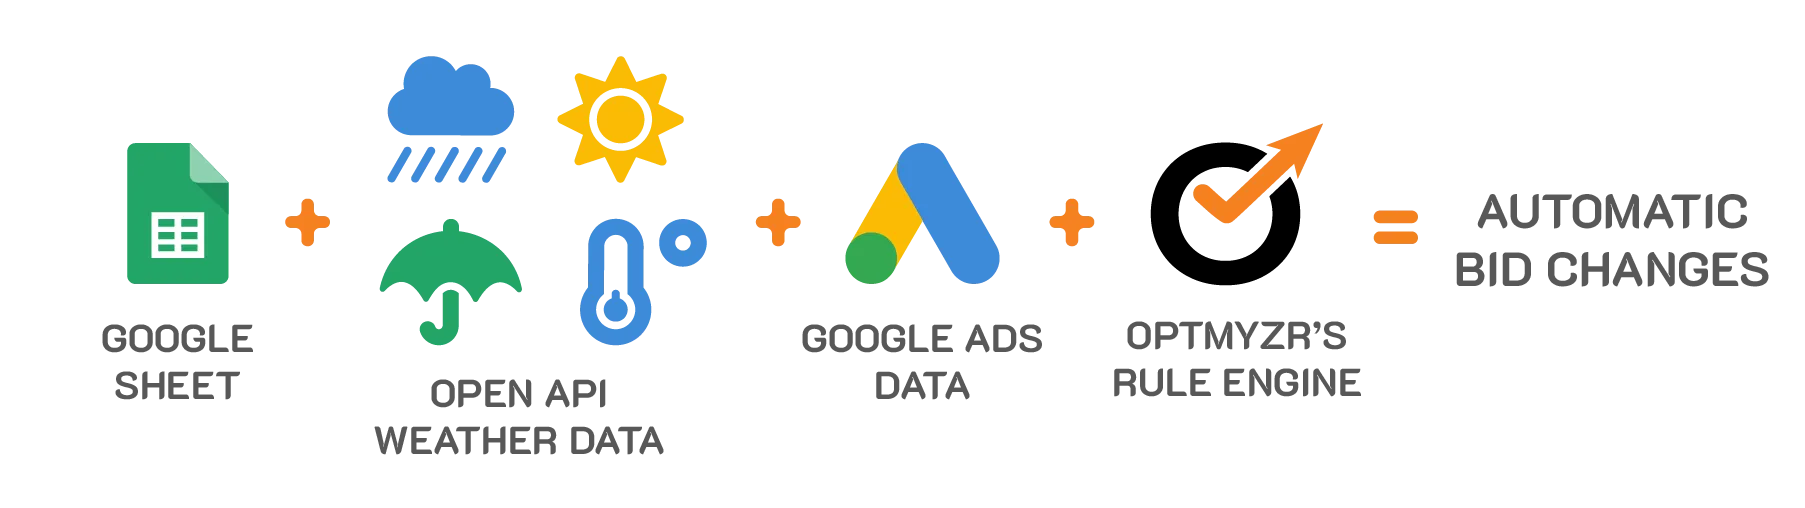
You know that old saying “when it rains… apply bid changes”. Well, that’s not really how it goes, but it’s most definitely one thing you can do with our Rule Engine!
In our last “Thinking Outside The Box” post, we showed you how to create a date-driven automation to change your campaign status. And that’s just one example of the many different (and powerful) use cases we have for Rule Engine.
Now we’ll show you how Optmyzr can help you automatically bid by weather. A similar case was also covered in the “Advanced Rule Engine Examples” video by our co-founder Frederick Vallaeys.
Step 1: Create the Recipe.

For this example, we’ll create a recipe to modify bids at the ad group level using values such as “Current Temperature” or “Current Weather Condition”.
Keep in mind that this is just one of many use cases for the Rule Engine weather bid management. Among the possibilities you’ll find you can:
- Increase/decrease bids at the keyword or product group level using weather data (e.g., increase bids for all keywords containing “air conditioners” during warm days).
- Change the status of your campaigns (e.g., pause your “bathing suits” campaigns if it’s snowing)
- And more!
Step 2: Set up the spreadsheet.
To set up the spreadsheet, you’ll need to make a copy of this Google Spreadsheet, and share it with rule-engine@optmyzr-automation.iam.gserviceaccount.com.
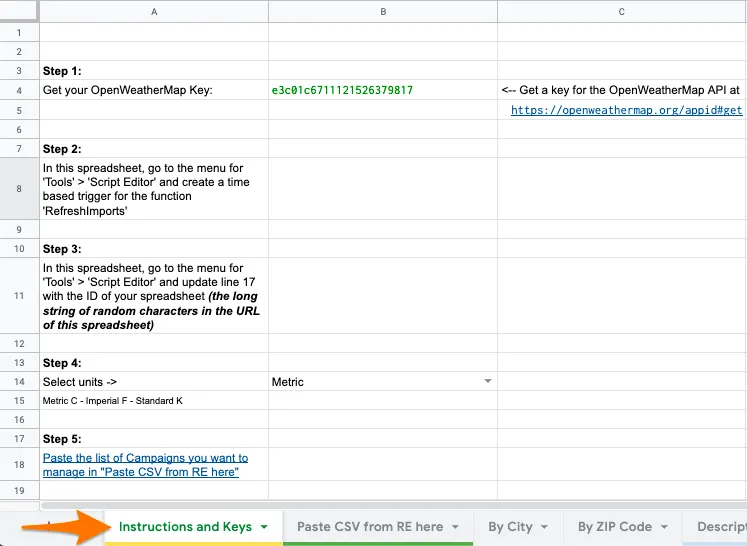
You’ll need to generate your own API key here https://openweathermap.org/appid#get and follow the rest of the steps listed on the sheet “Instructions and Keys”.
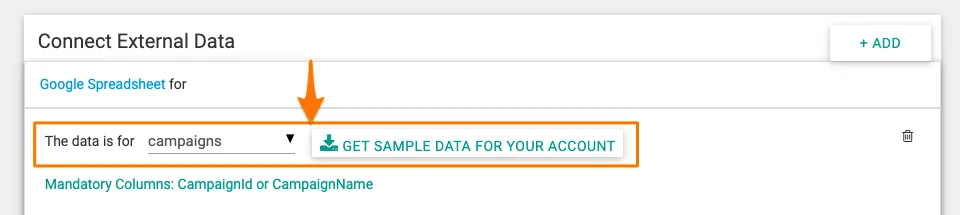
Note: For the last step on the spreadsheet, you can download your list of campaigns from the “Connect External Data” section in the Rule Engine by clicking on “Get Sample Data For Your Account” and pasting it exactly as it is on the “Paste CSV from RE here” sheet.
Step 3: Add the corresponding City or ZIP Code to each of the campaigns.
Now let’s add the corresponding City or ZIP Code to the campaigns. The spreadsheet has a couple of sheets to get weather data. Depending on which one you want to use, you’ll have to manually add the City or ZIP code to your list of campaigns.
For cities, please follow this format {city},{country code} (you can get a list of country codes here).

Note: If the country code is not specified, the OpenWeatherMap API might return data for the wrong city.
Step 4: Link the spreadsheet.
To link the spreadsheet to your recipe, you’ll need to paste the spreadsheet’s URL in the “Connect External Data” section. Make sure you specify the sheet from where the Rule Engine pulls weather data, and the correct column types (Current Temperature: Number|Current Weather Condition: Text).

Read further on “Connecting External Data in Rule Engine”.
Step 5: Build the recipe.
Let’s get down to business! Having completed these previous steps, you can now use any of the weather data from the spreadsheet to build your own custom optimization. Remember the spreadsheet has campaign data, so that’s the scope you should use when adding the conditions:

Let’s suppose that we have a couple of campaigns for “Sunglasses” in Madrid and “Shorts” in Toulouse. If temperatures start to rise, we might want to increase the bids for the ad groups in those campaigns accordingly.
The first rule does precisely this. If the temperature rises above 27ºC, and the weather condition is “clear sky” it applies two actions:
- We increase the bids for the ad groups in the campaign by 10%
- We label the ad groups (for the example we’ll use: Bid by High Temperature) – This step is critical, as it helps to revert the changes with Rule-2.

But what happens if the temperatures drop? The second rule reverses the changes applied by the first rule. To do this, we check all ad groups with the label “Bid by High Temperature” and apply two actions:
- Set the bids back to their previous value. We achieve this by using an expression where we divide the Current Bid by 1+(0.1) where 0.1 = 10% increase.
- We remove the labels “Bid by High Temperature”.

Note: In the same spreadsheet you can change the temperature units used (Instructions and Keys sheet – Step 4) and see a list of all weather conditions the Open Weather Map API can return (Descriptions sheet)
Step 6: Test, preview & automate.
All set! You can now preview the suggestions and if everything looks ok, you can go ahead and automate it to run on a daily basis.

Try it out! If you have any questions, or if you’d like us to have a look at your recipe before you start running it just email us at support@optmyzr.com – we’ll be glad to help you.
Related posts
We’ve made numerous enhancements to the Rule Engine. So we organized two webinars to show how it can be used to address a variety of use cases.
You can now watch the first Rule Engine webinar where I covered:
- An overview of the Rule Engine
- CPA or ROAS bid management with prebuilt recipes
- Automating your own bid strategy with custom recipes
- Using custom variables to make more dynamic rules
- Scaling your work across many accounts with favorite and global recipes
- How to put rules on auto-pilot
We’ve followed up this introductory webinar with an advanced one.
In this webinar I’ve shown more advanced use cases for the Rule Engine:
- Building rules using your own custom data
- Bidding by weather (or another external data source)
- Using different attribution models and different conversion types
Regular Pages
If you’ve done PPC advertising for a few years, you’d have realized that Google likes to push you to show your ads for more and more search queries.
In other words, it encourages you to run automated bidding and switch to broach match keyword type so that your ads are shown for a higher number of search queries, which means more clicks and ultimately more money for Google.
But if you’re running automated bidding and you’ve set limits on CPA or ROAS, trying broad match is not a bad idea, because why not let Google try to see if there are additional search queries out there that may drive good traffic and conversions for you?
Of course, you still have to be careful. You don’t want to show your ads for random queries. Plus, in some cases, even if Google has reduced your bid, it still may not perform well for you.
And as somebody reading this article, you probably like to have more control over your campaign. You’re listening to Google, you’re trying a bit of broad match, and now you want to check if Google is really showing your ads for the right queries.
The Rule Engine Strategy That Monitors New Search Queries
That’s why, we at Optmyzr, have built a tool to help you stay on top of all that. It’s called the Rule Engine.
The Rule Engine lets you create custom optimizations that can make bulk changes to your Google Ads, Amazon Ads, and Microsoft Ads accounts. These can be strategies that can help you bid to a target CPA or, give you a list of keywords and ad groups that are more expensive than their peers.
You can review and apply the suggestions or even automate the process by running the strategies on a schedule.
Now, here’s a strategy to monitor your new search queries in Google Ads.
It first compares the search query data of the past seven days with that of the previous seven days to find newer queries.
And then it presents the list of these new queries. Of course, you have to keep in mind if these queries did show up at some earlier time (even before those 14 or 7 days ago). You can control that using the rule engine by changing the date ranges, conditions, or boundaries to show the data you need.
Why Monitor New Search Queries?
Monitoring search queries this way provides you with some really useful insights.
You will learn about the changes in your audience’s behavior, interests, and priorities. Not just that, you can take those insights and use them in your other campaigns outside of PPC such as:
- Optimizing your landing pages
- Modifying copy/messaging in your email/social media marketing campaigns
- Creating organic content around those queries
Now, coming back to the strategy, you can create it using the Rule Engine by following the below steps.
How to Monitor New Search Queries in Google Ads Using Rule Engine?
Step 1: Go to Optimizations -> Rule Engine -> View & Create strategies.
Step 2: On the top-right, click Add Strategy -> Add new strategy.
Step 3: Select ‘Pick Optmyzr recommended strategy’ and click ‘Next’.
Step 4: Under ‘Select a Goal’, select ‘Search Queries’ and click ‘Next’.
Step 5: You will find multiple strategies here. But for this use case, select ‘New Search Queries’ and click ‘Next’.
Step 6: Click ‘Show me Optmyzr’s suggestions’. This is the fastest way to view your results. But if you want to customize the strategy like changing the date ranges and adding more criteria, click ‘Give me full control’. Then click ‘Proceed’.
Rule Engine prepares the strategy and previews the results. Depending on the size of your account, this may take up to a few seconds to a minute.
And now you’ll see the new search queries that are appearing in your account.
Safeguard your PPC campaigns
In the wake of ad platform automation, setting up even the smallest of changes, like the one above that takes just a few minutes goes a long way in protecting your PPC accounts, providing a bit of PPC insurance if you will.
So, if you like what you’ve seen, go ahead and try it in your Optmyzr account. But if you don’t have one yet, consider starting a 14-day free trial. You can use all of our tools with no limitations to manage your PPC more efficiently.
Our support team always receives very interesting questions from our customers, and some of these questions require creative solutions. An example is “How can we set different daily budgets for each day of the week or month?”.
And while this question would have had us scratching our heads a while ago, now the answer is simple: You can automatically change daily budgets on specific dates using Rule Engine and Google Sheets.
Let’s say your account runs a promotion on Tuesdays, or the highest volume of purchases occurs during the first five days of the month, so you want to allocate more budgets on these specific days.
With the method I describe below, you won’t have to worry about updating your budgets manually. You will only need to connect a Google Sheets document with the correct information to Rule Engine and let Optmyzr take care of updating the daily budgets for you.
Step 1: Create a new strategy for Budgets in Rule Engine.
Go to Optimizations > Rule Engine > View & Create Strategies and click Add a New Strategy > Create my own strategy > Budgets.
Step 2: Set up your spreadsheet.
Make a copy of this spreadsheet. Go to the “File” menu and select “Settings” to update the spreadsheet’s time zone.
Next, click the “Share” icon and share view access with rule-engine@optmyzr-automation.iam.gserviceaccount.com (this is the email address Rule Engine will use to read your spreadsheet contents).
Step 3: Connect your spreadsheet to Rule Engine.
Go back to your Rule Engine strategy, click “Settings” and navigate to “External Data” to paste your spreadsheet’s URL.
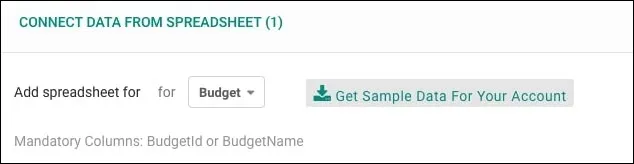
In the column settings, select “Number” as the value type for “Today’s budget”.
Next, click the “Get Sample Data For Your Account” button to download a CSV that includes your account’s complete list of budgets with their corresponding IDs and names.
You will need this information to complete the Google Sheets document.
Step 4: Add your budgets to the spreadsheet.
Back on your Google Sheets document, you’ll see three different sheets:
In the “Budgets” sheet, add a row for each of the budgets you want to update automatically, along with any of the following mandatory fields that you got from the CSV mentioned in the previous step:
- BudgetId: The ID of the budget to manage
- BudgetName: The name of the campaign or shared budget you want to manage automatically. This field is a case-sensitive, exact match.
Note: You don’t necessarily need to include both BudgetId and BudgetName. Just one of the two will do.
For each budget, make sure to select where to get the daily budget from (Week or Month sheet):
You can specify the daily budgets per date in the “Month” and “Week” sheets. The “Budgets” sheet will automatically grab the information from any of these, depending on your preference.
For example, I have a specific budget for Tuesdays for Sample Budget A, so I select “Get budget from Week sheet” and update the Tuesday budget in the Week sheet accordingly.
Step 5: Finish your Rule Engine strategy.
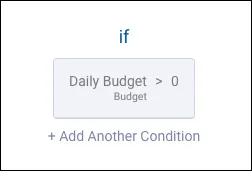
Go back to your Rule Engine strategy once more and add a neutral condition (if statements), for example: Daily Budget > 0.
Note: A neutral condition is a parameter that is always true. Since we’re not creating a performance-based optimization, a condition like “Daily Budget > 0” ensures that the strategy runs all budgets from your spreadsheet.
Now let’s update the Actions (then statements); by default, this is set to “Include in Report” click it to edit it and change it to “Modify Daily Budget” and “Set Daily Budget”.
In the “Set Daily Budget to” field, change the Value Type to “A Spreadsheet Column” and choose “Today’s budget”:
You can follow the same steps for the “Min daily budget” and “Max daily budget” fields.
Step 6: Test, preview and automate.
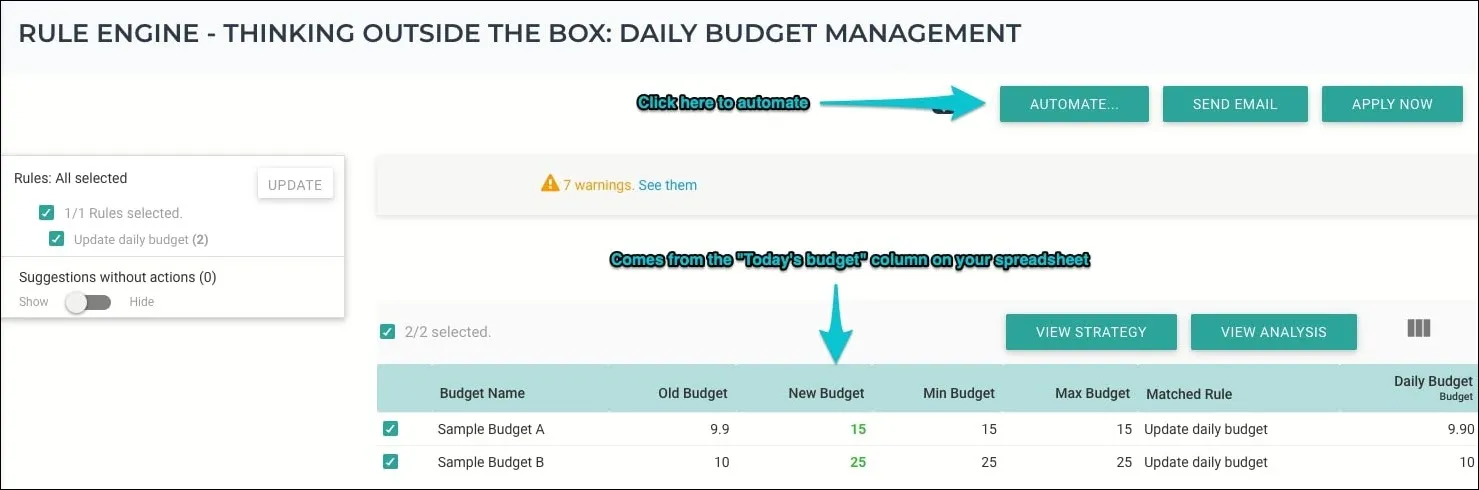
After you complete all the previous steps, your strategy should look like this:
You can now click the “View Suggestions” button to preview and automate your strategy.
Note: You may get some warnings. As long as none of the warnings are for the actual budgets you want to update (the ones on your spreadsheet), you can ignore them.
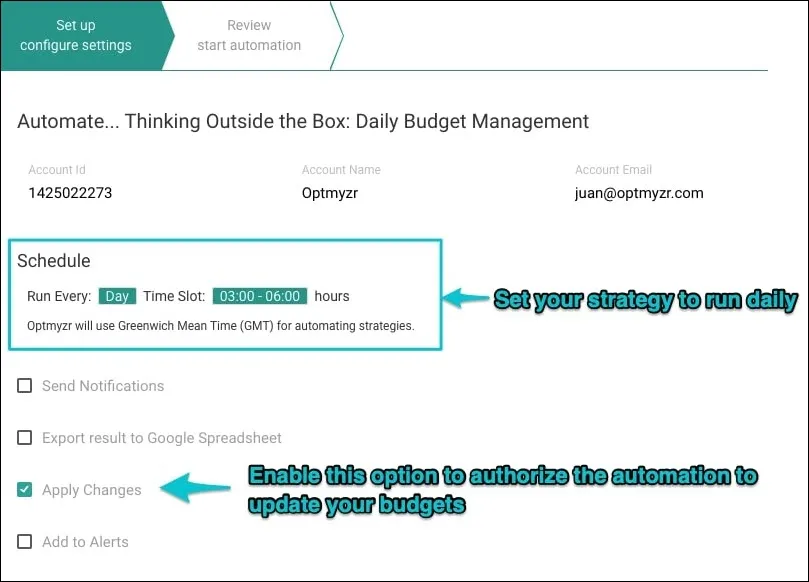
If everything looks good and you are ready to automate your strategy, click “Automate” and set it to run daily within any of the listed time ranges. Remember that these are in GMT, so be sure to use the closest equivalent time to midnight in your time zone.
Don’t forget to enable the “Apply Changes” option to authorize Rule Engine to apply changes to your budgets with this automation schedule.
That’s all! If you have any questions, or if you’d like us to have a look at your strategy before you start running it, just email us: support@optmyzr.com – we’ll be glad to help you.
Additional reads we recommend
You know that old saying “when it rains… apply bid changes”. Well, that’s not really how it goes, but it’s most definitely one thing you can do with our Rule Engine!
In our last “Thinking Outside The Box” post, we showed you how to create a date-driven automation to change your campaign status. And that’s just one example of the many different (and powerful) use cases we have for Rule Engine.
Now we’ll show you how Optmyzr can help you automatically bid by weather. A similar case was also covered in the “Advanced Rule Engine Examples” video by our co-founder Frederick Vallaeys.
Step 1: Create the Recipe.
For this example, we’ll create a recipe to modify bids at the ad group level using values such as “Current Temperature” or “Current Weather Condition”.
Keep in mind that this is just one of many use cases for the Rule Engine weather bid management. Among the possibilities you’ll find you can:
- Increase/decrease bids at the keyword or product group level using weather data (e.g., increase bids for all keywords containing “air conditioners” during warm days).
- Change the status of your campaigns (e.g., pause your “bathing suits” campaigns if it’s snowing)
- And more!
Step 2: Set up the spreadsheet.
To set up the spreadsheet, you’ll need to make a copy of this Google Spreadsheet, and share it with rule-engine@optmyzr-automation.iam.gserviceaccount.com.
You’ll need to generate your own API key here https://openweathermap.org/appid#get and follow the rest of the steps listed on the sheet “Instructions and Keys”.
Note: For the last step on the spreadsheet, you can download your list of campaigns from the “Connect External Data” section in the Rule Engine by clicking on “Get Sample Data For Your Account” and pasting it exactly as it is on the “Paste CSV from RE here” sheet.
Step 3: Add the corresponding City or ZIP Code to each of the campaigns.
Now let’s add the corresponding City or ZIP Code to the campaigns. The spreadsheet has a couple of sheets to get weather data. Depending on which one you want to use, you’ll have to manually add the City or ZIP code to your list of campaigns.
For cities, please follow this format {city},{country code} (you can get a list of country codes here).
Note: If the country code is not specified, the OpenWeatherMap API might return data for the wrong city.
Step 4: Link the spreadsheet.
To link the spreadsheet to your recipe, you’ll need to paste the spreadsheet’s URL in the “Connect External Data” section. Make sure you specify the sheet from where the Rule Engine pulls weather data, and the correct column types (Current Temperature: Number|Current Weather Condition: Text).
Read further on “Connecting External Data in Rule Engine”.
Step 5: Build the recipe.
Let’s get down to business! Having completed these previous steps, you can now use any of the weather data from the spreadsheet to build your own custom optimization. Remember the spreadsheet has campaign data, so that’s the scope you should use when adding the conditions:
Let’s suppose that we have a couple of campaigns for “Sunglasses” in Madrid and “Shorts” in Toulouse. If temperatures start to rise, we might want to increase the bids for the ad groups in those campaigns accordingly.
The first rule does precisely this. If the temperature rises above 27ºC, and the weather condition is “clear sky” it applies two actions:
- We increase the bids for the ad groups in the campaign by 10%
- We label the ad groups (for the example we’ll use: Bid by High Temperature) – This step is critical, as it helps to revert the changes with Rule-2.
But what happens if the temperatures drop? The second rule reverses the changes applied by the first rule. To do this, we check all ad groups with the label “Bid by High Temperature” and apply two actions:
- Set the bids back to their previous value. We achieve this by using an expression where we divide the Current Bid by 1+(0.1) where 0.1 = 10% increase.
- We remove the labels “Bid by High Temperature”.
Note: In the same spreadsheet you can change the temperature units used (Instructions and Keys sheet – Step 4) and see a list of all weather conditions the Open Weather Map API can return (Descriptions sheet)
Step 6: Test, preview & automate.
All set! You can now preview the suggestions and if everything looks ok, you can go ahead and automate it to run on a daily basis.
Try it out! If you have any questions, or if you’d like us to have a look at your recipe before you start running it just email us at support@optmyzr.com – we’ll be glad to help you.
Related posts
We’ve made numerous enhancements to the Rule Engine. So we organized two webinars to show how it can be used to address a variety of use cases.
You can now watch the first Rule Engine webinar where I covered:
- An overview of the Rule Engine
- CPA or ROAS bid management with prebuilt recipes
- Automating your own bid strategy with custom recipes
- Using custom variables to make more dynamic rules
- Scaling your work across many accounts with favorite and global recipes
- How to put rules on auto-pilot
We’ve followed up this introductory webinar with an advanced one.
In this webinar I’ve shown more advanced use cases for the Rule Engine:
- Building rules using your own custom data
- Bidding by weather (or another external data source)
- Using different attribution models and different conversion types